Saturday, July 4, 2009

Crocheting

Amigurumi Part 6

MATERIALS:
F hook
Worsted weight yarn
Polyfill
Safety eyes
Yarn needle
Embroidery thread
Tapestry needle
Felt
Sewing thread
Poly pellets
Patterns by Ana Paula Rimoli, Amigurumi World: Seriously Cute Crochet

Meet Scoop Scoop


...and Joe :)


Happy Birthday, Reina! :)

Thursday, June 18, 2009

Crocheting

Amigurumi Part 5


He's small. He's stealthy. He's deadly. He's devastatingly...cute?

Meet Ginsu
Name: Ginsu
Birthday: 6/17/09
Gender: Male
Height: 3-3/4"
Weight: 2 ounces
Occupation: Assassin/illusionist/sabotage and espionage artist
Will work for: Ramen
Weapon of choice: Ninja star
Favorite word/phrase: Kee-ya!

MATERIALS:
Worsted weight yarn
F hook
Safety eyes
Polyfill
Foil
Craft felt
Yarn needle
Hot glue gun/glue stick
Pattern by Christen Hayden, Creepy Cute Crochet: Zombies, Ninjas, Robots, and More!, with adaptations by yours truly

Birth of Ginsu - the Saga

The birth of Ginsu was somewhat of a miracle. Upon my embarkment of this project, I realized to my great dismay that, crap, I can't really read this pattern (or any other pattern in the otherwise fabulous book)! The result of that discovery was that I had to sort of wing it and make up my stitches along the way, and just hope that everything will come out in the right shape in the end. They did, I think, for the most part.

So far, so good.

I then set out to fabricate a ninja star out of a teeny crochet hook and some ultra cool, metallic embroidery thread I found at the fabric store. Ten minutes and many frustrated ARRRRGS later, I concluded that the teeny hook was indeed too teeny and the cool emboridery thread entirely too slippery. What's a ninja to do without his star???

That was when I had a brainstorm and decided to make the star out of plain foil (and when Ryan very chivalrously consumed a See's dark chocolate ball so that I may have the ensuing shiny foil). And...voila!

I hope you enjoyed!

p.s. Thank you to the Facebookers who responded to my poll. You are the reason Ginsu is here today! For those of you who didn't vote for a ninja, remember he's very stealthy and deadly, and can probably hunt you down no matter where you are. So be scared. Be very scared...


Monday, June 15, 2009

Crocheting

Amigurumi Part 4

Have you giggled today?

MATERIALS:
Worsted weight yarn
F hook
Yarn needle
Felt
Embroidery thread
Tapestry needle
Safety eyes
Sewing thread
Sewing needle
Poly fill
Pattern by (you guessed it) Ana Paula Rimoli, Amigurumi World: Seriously Cute Crochet

Meet Perry!


I must say, I am totally in love with Perry! I am sooooo happy with how he turned out, and I really think he's the cutest thing I've made yet! There's just something about those pink cheeks and that goofy lopsided smile...I'm thrown into a giggle fit everytime I see him. I'm hoping he'll do the same for you!

Crocheting

Amigurumi Part 3

MATERIALS:
Worsted weight yarn
F hook
Yarn needle
Safety eyes
Sewing thread
Sewing needle
Poly fill
Pattern by Ana Paula Rimoli, Amigurumi World: Seriously Cute Crochet


Meet Dash


Dash came out not quite as good I'd hoped he would, but with a name like that, I think he still deserves a spot on this blog :)

Wednesday, June 3, 2009

Crocheting

Amigurumi Part 2

MATERIALS:
Worsted weight yarn
H hook
Yarn needle
Safety eyes (on penguin)
Pearlized straight pins (on cupcake)
Polyfill (penguin)/cotton balls (cupcake)
Sewing needle
Sewing thread
Beads
Patterns by Ana Paula Rimoli, Amigurumi World: Seriously Cute Crochet

Meet Sprinkles the cupcake...

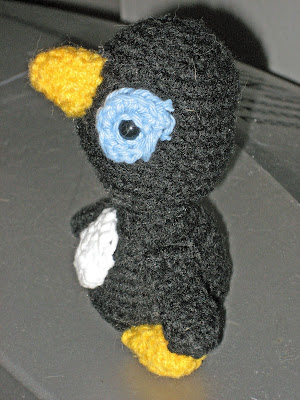
...and Milton the penguin! :)


I made Milton at the request of the BF. It took me like 6 hours (I'm a beginner!), but at least he came out super cute, if I do say so myself!

I am now totally hooked on this stuff - no pun intended!


Saturday, May 30, 2009

Crocheting

Amigurumi

Amigurumi is the Japanese word for "knitted (or in my case, crocheted) stuffed toy." Here's my first attempt.

MATERIALS:
Worsted weight yarn in cream and pumpkin
F hook
Yarn needle
Cotton balls*
Pearlized straight pins**
Pattern by Lionbrand.com, available here

I debated whether I should post the pictures of my finished product, since it's obviously not made that well/a little demented looking. Then I decided, what the heck. It makes me laugh every time I look at it, so that alone should earn it a spot on this blog.


And here it is...
My ugly-cute chick!
Hefa is the name :)


Check out the crazy looking beak :D


And here she is, looking like a winged banana...


Slam dunk? :D


Well, I hope Hefa's made you laugh, or at least have a little chortle.

*Polyfill is actually the "proper" stuffing for amigurumi. I didn't have any on hand, so I used what I did have - cotton balls - instead.

**Again, not exactly the "proper" material to use here. Basically, I decided to stick a couple of pins on the chick's head for the eyes because I was too lazy to sew the eyes on. Whatever works, right? :)


Monday, May 25, 2009

Sewing

For as long as I can remember, I've been wanting to learn how to use a sewing machine. I mean, how cool would it be to make my own clothes, or just to be able to hem my own always-too-long pants? Well, I still don't know for sure just how cool it would be to do those things (though I can sure imagine!), but thanks to Ryan's mom and her saint-like patience, I present to you my first ever sewing machine project...


...A reversible apron! :)


What side 1 looks like in the front (I LOVE the print!)


The side view


Another side view


What the back looks like


What side 2 looks like in the front


A side view


Another side view


From start to finish, this apron took me about 6 hours. Yup, that's right, 6 hours - I started cutting the fabric (7 separate pieces of fabric were used to make this apron) at around 7 PM, made my last stitch at around 1 AM, and spent at the very least an hour removing bad stitches and restitching in between. I have to say though, I have never felt so proud of anything I've ever made, not just because I've never ever used a sewing machine before and was therefore totally out of my "comfort zone," but I've actually made something that's not just super cute, but is actually useful! Now, I love cute, useless things (as evidenced by the majority of my other blogs), but cute AND useful? Whoa. I'm impressed :D

Anyway, being the super ambitious (or should I say, totally clueless) person that I am, I actually picked up enough fabric to make two aprons - this one, and a full-body one - that I was going to make in the SAME day. Well, that didn't happen. So for now, I will just say that the 2nd one involves cupcakes. And polka dots...

Until next time! :)

Monday, May 18, 2009

Cooking

Bibimbap!

Driven by an incredibly strong craving for Korean food, I made my first attempt at making bibimbap (a popular Korean dish that literally means "mixed rice") last Friday. I must say that it turned out FANTASTIC :) Sure, it was a very labor intensive meal (LOTS of chopping and I sadly do not own any kind of "chop wizard" or the like) and it took me like two hours to prep/cook everything, but it was soooo worth it (not to mention much, much cheaper than if we had gone out!).

Ingredients (listed clockwise in picture below):
- Sauteed shitake mushrooms
- Sauteed carrots
- Sauteed zuchini
- Fried egg
- Cooked seasoned bean sprouts
- Cooked seasoned spinach
- Bulgogi (marinated Korean BBQ sliced very, very thin; I got this pre-sliced/marinated from the awesome Kim's Mart in downtown Davis. My trusty electric grill did all the work once I got it home)
- Cooked white rice (not pictured)
- Gochujang (not pictured; seasoned Korean chili paste, also from Kim's Mart; a must have for this dish!)


What it looks like when it's all assembled.


YUM!! :)

Wednesday, January 21, 2009

Papercraft

Origami

I've been playing with origami since I was a wee one. My first projects included the ever-popular paper planes, the banger, the newspaper hat, shirts and pants, Japanese-style covered boats (called sampans, if I'm not mistaken), frogs for hopping contests, and the waterbomb (except we - that would be my sister, our horde of cousins, and I - never put any water in our "bombs," we just puffed them up by blowing air into them). So in many ways, origami today is as much a hobby for me as it is a quick fix for nostalgia.

I made these recently, as "trial runs" for a few potential would-be Valentine's Day card decorations for Ryan. (Don't worry, there won't be be any spoiled surprises. He's already seen them. In fact, I've already given them to him.)

Materials:
1 piece double sided origami paper for each project

This is why I regard origami designers as geniuses. Who looks at a piece of paper and goes, I'm going to turn it into this - and bam! - here we are.


What the back looks like

Did I mention that this was made with just ONE piece of paper? In this case, leopard print on one side, blue on the other. No cutting, no gluing....just a whole lotta folding. I gotta say though, the instructions for this were pretty horrid, and they made me thiiiiiiiiiis close to just crumpling up the paper and calling it a day more than a few times. The designer (Francis Ow) is still a genius though. ONE piece of paper!

These I made just because. I am really diggin' the wings!

Designs by Francis Ow and Kathleen Weller ("blooming heart," bottom left and right).

Saturday, January 17, 2009

Papercraft

Washi Eggs


I made these eggs for Ryan's dad, Jim, for Christmas two years ago, after learning that he collects decorative eggs. Since I had never made - or even heard of - Washi eggs before, I had pretty much no idea what I was getting myself into when I ordered the kit online.


Materials:
Wooden eggs (in kit)
Wooden egg stands (in kit)
Chiyogami paper (decorative Japanese paper - in kit)
Gloss finishing glaze (in kit)
Paint brush (in kit)
Craft glue
Scissors


After a whole lot of cutting and pasting, here are my finished products.


Want to make your own? Here's where you can get a kit.


I bet it would be super badass if someone made a bunch of them and displayed them in a nice, big glass bowl with a really wide mouth. I actually thought about doing that, but then I remembered how long each egg took me, and that was the end of that brilliant idea.


One of these days, though...