Wednesday, January 21, 2009

Papercraft

Origami

I've been playing with origami since I was a wee one. My first projects included the ever-popular paper planes, the banger, the newspaper hat, shirts and pants, Japanese-style covered boats (called sampans, if I'm not mistaken), frogs for hopping contests, and the waterbomb (except we - that would be my sister, our horde of cousins, and I - never put any water in our "bombs," we just puffed them up by blowing air into them). So in many ways, origami today is as much a hobby for me as it is a quick fix for nostalgia.

I made these recently, as "trial runs" for a few potential would-be Valentine's Day card decorations for Ryan. (Don't worry, there won't be be any spoiled surprises. He's already seen them. In fact, I've already given them to him.)

Materials:
1 piece double sided origami paper for each project

This is why I regard origami designers as geniuses. Who looks at a piece of paper and goes, I'm going to turn it into this - and bam! - here we are.


What the back looks like

Did I mention that this was made with just ONE piece of paper? In this case, leopard print on one side, blue on the other. No cutting, no gluing....just a whole lotta folding. I gotta say though, the instructions for this were pretty horrid, and they made me thiiiiiiiiiis close to just crumpling up the paper and calling it a day more than a few times. The designer (Francis Ow) is still a genius though. ONE piece of paper!

These I made just because. I am really diggin' the wings!

Designs by Francis Ow and Kathleen Weller ("blooming heart," bottom left and right).

Saturday, January 17, 2009

Papercraft

Washi Eggs


I made these eggs for Ryan's dad, Jim, for Christmas two years ago, after learning that he collects decorative eggs. Since I had never made - or even heard of - Washi eggs before, I had pretty much no idea what I was getting myself into when I ordered the kit online.


Materials:
Wooden eggs (in kit)
Wooden egg stands (in kit)
Chiyogami paper (decorative Japanese paper - in kit)
Gloss finishing glaze (in kit)
Paint brush (in kit)
Craft glue
Scissors


After a whole lot of cutting and pasting, here are my finished products.


Want to make your own? Here's where you can get a kit.


I bet it would be super badass if someone made a bunch of them and displayed them in a nice, big glass bowl with a really wide mouth. I actually thought about doing that, but then I remembered how long each egg took me, and that was the end of that brilliant idea.


One of these days, though...

Sunday, January 11, 2009

Beading

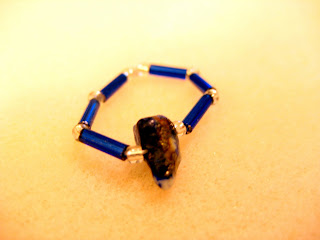
Back when I was in elementary school, I used to love going to this place called Beads and Things. It was just down the street from where I used to live in Cupertino, and it had the coolest, most beautiful array of beads, stones, and various jewelry findings anyone could wish for - a real beader's heaven. Anyway, after all the fun I've been having with making Shrinky Dinks jewelry, I decided to pick beading back up and see what I can do now. I made these last night.


Materials:
Seed beads
Bugle beads
Stretchy beading string
Semi precious stone chips
Clear nail polish (for knot sealing)


The first ring I made.


For some reason, this one turned out a little bigger than my previous one, which went on my middle finger. I tried this one out on my big toe, however, and it was the perfect fit :)


I got a little more ambitious after the rings, and decided to make a choker...


...which I happily discovered could also easily be "converted" into a bracelet.

I was so happy with how the necklace/bracelet turned out that I decided to make a matching ring for it.

Here's a shot of all three rings together. Good times!

Shrinky Dinks

I made this Domo-kun choker and earring set for my soon-to-be-wedded (yay!) friend, Amara, for Christmas. I raided my jewelry drawer for the holder thingie they're on. 

Materials:
Shrinkable plastic
Colored pencils
Black nylon cord
Jump rings
Clamshell cord ends
Earring hooks
Lobster clasp
Scissors
Pliers
Picture of Domo-kun found on Google.com :)

- Photograph by Amara Kay - 

Friday, January 9, 2009

Pumpkin Carving

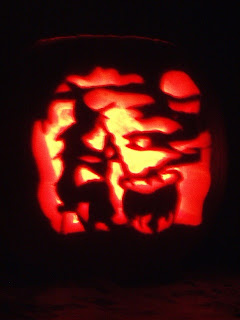
One of my favorite things about Halloween is the carving of pumpkins. They're messy as hell, but I always feel so accomplished when I'm done. 

Materials:
Pumpkin
Pumkin carving tools
Scoop or ladle
Carving patterns
Newspaper (to cover the work area)
Tealight candle
Lighter

This one was from 2007, the last time I carved a pumpkin.

This one is from 2006, as well as my favorite. I LOVE the effect from the candlelight!

Thursday, January 8, 2009

Crocheting

For years, I've been wanting to learn how to crochet. A couple of months ago, I finally started turning those thoughts into actual action. After many, many exasperating failed attempts at teaching myself how to crochet, I finally started to get the hang of it after two very long weeks. That's really, really impressive for me, since I usually give up whatever it is I may be trying to learn if I don't catch on in a reasonable amount of time (meaning, right away).

Materials:
Yarn
Crochet hooks
Yarn needle
Crochet patterns


Here is the very first thing I successfully crocheted. It's a soap cozy! The top can be tightened and/or loosened by tugging on the loop attached to the pouch. It's made to be hung in the shower, and it is much easier to make than it probably looks.


This is what it looks like when it's actually holding a bar of soap. It was a present for my sister, Kristina.

- Photograph by Kristina Hsieh -

This was my second crochet project. The pattern I used was for a jewelry roll, but I made it bigger so that I can use it as a handy little crochet hook holder. It holds about 8 crochet hooks, plus two yarn needles.

Needlework

::Cross Stitch::

I started cross stitching my second year in college. Eight years and many abandoned projects later, here are what I've actually managed to complete. 

Materials:
Needle
Thread
Scissors
Cross stitch hoop
Cross stitch fabric
Cross stitch pattern

Here's the very first cross stitch I ever completed. Words cannot describe my joy and disbelief as I made the last stitch...I never in all honesty thought I'd ever actually finish one of these things! It probably helped that it's only 2.5" in diameter. Why didn't I start out with something this size back when I first took up this craft??


After Eeyore, I got to feeling really ambitious. I made this as a Christmas present for Gayle, Ryan's fabulous mother. I must say, I am extremely pleased with how it turned out, especially after I matted and framed it. 


Here's a closer look at it.


And an even closer look.

- Photographs by Ryan Pugh - 

Tuesday, January 6, 2009

Shrinky Dinks

All of these were made from Shrinky Dinks shrinkable plastic...why should kids have all the fun?

Materials:
Shrinkable plastic
Permanent markers
Pencil
Colored pencils
Black nylon cord
Jump rings
Lobster clasps
Clamshell cord ends
Scissors
Pliers


Here's my very first Shrinky Dinks creation. I think I wear it more than any of the other jewelry I own...even the "real" store-bought ones.


A close up.

Papercrafts

::Quilling::

Quilling is just a fancy word for twirling paper. With enough patience - and strips of paper - you can really whip up with some pretty neat stuff!

Materials:
Colored paper strips
Quilling tool
White craft glue
Toothpick (to apply the glue)
Googly eyes

The tape you see on the backs of these creations was used to secure them to the multimedia shelf on which they were displayed. Only teeny bits of glue were used the put the animals together.


::Origami::

Here's the Valentine's Day card I made for my boyfriend, Ryan, last year. You can flatten or pucker the lips by pulling on or squishing the sides of the paper. It's really pretty cool (and really creepy if you hold it right over your mouth and look at yourself in the mirror).

Materials:
1 sheet double sided origami paper
That's it!


Clay

Here are a few more creations from my college days.

Materials:
Sculpey clay
Sculpting tools
Toaster oven
Wax paper

My take on the Three Wise Monkeys: See no evil, Speak no evil, Hear no evil.

Here's a close-up of my favorite of the three monkeys.

And here we have a dopey penguin.

Here is the bear that started it all - the very first bake-able clay thing I ever made. I was supposed to make it with the pre-made molds that came with the clay, but I never figured out how to do that, so I just made it freehand. I think it's way more fun that way anyway.

I was very pleased with how this turned out. The "sticks" method really worked for the nest! I was also very happy with the marbling I did for the eggs.


Woodwork

I made these several years ago, when I was still in college.

::Wood Painting::

Materials:
Wooden cat carving (pre-made)
Acrylic paint
Clear coat
Paint brush

This was my first and only attempt at wood painting. The cat is painted to look like Cinnamon, my giant orange tabby.


::Wood Burning::

Materials:
Wood
Wood burner
Pencil
Eraser
Pictures for inspiration


My hand slipped while I was working on the cookie jar, hence the flowers :)